Crafting Your Own Yule Log Traditions
Crafting Yule Log Traditions; Winter can be a challenging time of year. The limited daylight, cold temperatures, and a seemingly dead landscape can be challenging. For some people, the winter months can feel like they drag on forever. However, it’s important to find small ways to celebrate more frequently during this time, and what better way to celebrate than by creating your own Yule log traditions?
Yule is the ancient pagan celebration of the Winter Solstice, which takes place on the shortest day of the year, usually around December 21st. It’s a time to celebrate the return of the sun and the gradual lengthening of the days. Yule traditions vary from culture to culture, but many involve the lighting of candles, the burning of a Yule log, and feasting with family and friends.
Crafting Yule Log Traditions: Here Are Some Ideas to Get You Started:
Choose Your Log
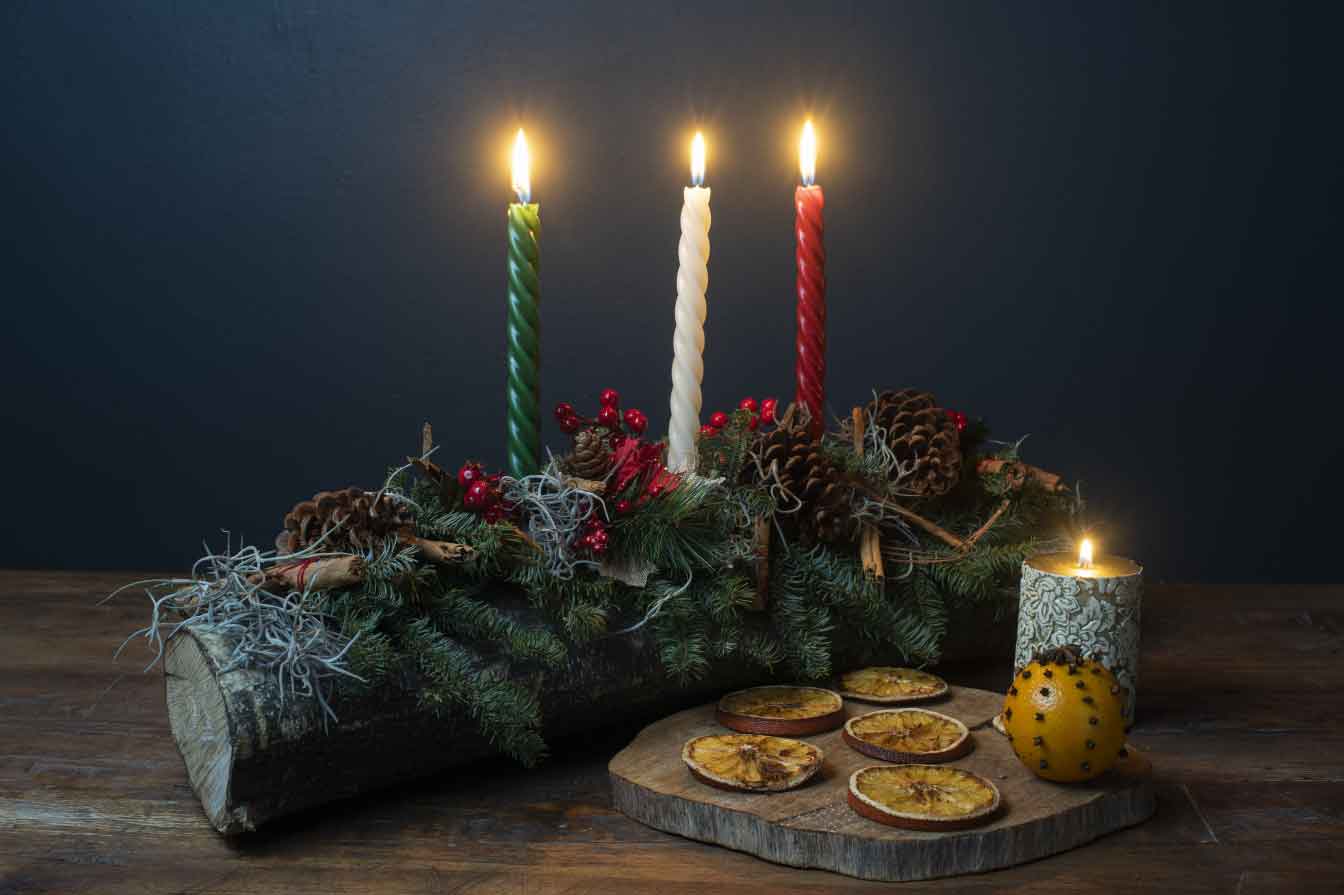
Traditionally, a Yule log was a large log that was burned in the fireplace on the night of the Winter Solstice. Today, you can create your own Yule log using a smaller log or even a Yule log candle holder. When choosing your log, consider the size of your fireplace or the space where you plan to burn it. You can also choose a log that has personal significance to you, such as one that you found on a hike or one that was gifted to you by a loved one.
Decorate Your Log
Once you have your log, it’s time to decorate it! You can use natural materials such as pinecones, holly, or evergreen branches to decorate your log. You can also add ribbons, beads, or other decorations that have personal significance to you. As you decorate your log, think about what you want to manifest in the coming year. For example, you might add a symbol of abundance, love, or health to your log.
Choose Your Candles
Yule log traditions often involve burning candles in the log. If you choose to burn candles in your log, consider using beeswax candles. Beeswax candles have a natural honey scent and are free from harmful chemicals. You can also choose candles in colors that represent the elements, such as green for earth, red for fire, blue for water, and yellow for air.
Crafting Yule Log Traditions: Plan a Special Meal
Yule is a time for feasting with family and friends. Plan a special meal that includes foods that are meaningful to you. You might include traditional Yule foods such as roasted root vegetables, mulled wine, or spiced cider. As you prepare your meal, think about the intentions you want to set for the coming year.
Reflect on the Year That Has Passed
Yule is a time for reflection and gratitude. Take some time to reflect on the year that has passed and all that you have accomplished. Write down your reflections in a journal or share them with a loved one.
Crafting Yule Log Traditions: Light Your Log
On the night of the Winter Solstice, light your log and candles. As you watch the flames dance, take some time to meditate or simply enjoy the warmth of the fire. You might also use this time to set your intentions for the coming year. Visualize what you want to manifest in your life and feel gratitude for all that you have.
Crafting Yule Log Traditions is a wonderful way to celebrate the turning of the year and the movement towards the sun.
Need Taper Candles? I’ve got just the taper candles for you, handmade by me with locally sourced beeswax including my own! Save 10% off of your beeswax taper candles for this project with discount code: TAPER10
Ordering outside of Canada? Visit my Etsy Shop

Crafting Your Own Yule Log Traditions
Equipment
- A hot glue gun & glue
- Pair of scissors
- Handsaw, sander, or other equipment to level the log lengthwise to create a flat stable surface for the log to rest on.
- Drill & 7/8-Inch High-Speed Steel Forstner Bit
- Marker, pen, or pencil (must be able to leave visible marks on your log)
Materials
- 1 Log 14 – 18” long
- 4 Taper Candles Tapers should be 7/8" wide at the base. you can get less or more candles depending on the amount you would like your candle holder to have.
- 1 Bunch Cuttings of mistletoe, holly, pine needles, and ivy
- 1 Bunch Dried mosses
- 1 Bunch Dried decorations such cranberries, pine cones, orange slices, and cinnamon sticks
Instructions
- Step 1: First you need to choose the side of the log (lengthways) that you would like to be the top of your candle holder. The opposite side needs to be made level so that the candle holder will sit securely on a flat surface. Depending on the log you selected, you can make the underside flat with a sander, hand saw or another saw that you might have on hand. The goal is to make the log sit sturdily on a surface. Plugin your hot glue gun so that it begins to heat up.
- Step 2: Next measure out the distance you would like between each candle. Keep in mind that there should be a bit of buffer space between the ends of the log and the outer candles. You also might want to consider not placing your candles too close together, as the closer they are the faster they will burn down. Mark the places you would like your candle holes drilled with the marker.
- Step 3: Now it's time to drill the holes for your candles. Take your drill with the 7/8" drill bit and drill a hole on top of each of your marks on the log. The hole should be about 1.5" deep, your candles should fit snuggly in the hole and should not be loose, if you need to drill a slightly deeper hole, do so.
- Step 4: Place your candles in the candle holders, and to tidy up the place where you made the holes glue some of the mosses around the base of where the candles meet the log. If the candle fit is a little loose you can use the mosses inside the holes to tighten up the space around the candles. You may want to remove your candles while decorating to avoid them being broken.
- Step 5: Next, begin decorating your log with the cuttings, dried berries, pine cones and/or orange slices, and cinnamon sticks. When creating your layout, think about balance and continuity in your design. How much of the log would you still like to see? Be mindful that when the candles melt they may drip, so you may want to leave a space around the candle base. But most of all, just have fun!
- Step 6: Place your candles in their holders and display your log!
Notes
Don’t forget to check out our other Holiday Traditions Kits and our Holiday Traditions How-To Posts:


About The Author
wilding.stephanie
Related Posts

Sweet Traditions: The Enchanting Role of Honey in Holiday Lore
Throughout history, honey has been more than a sweet treat; it has served as a…
December 18, 2024
Mastering The Holiday Centerpiece in 3 Easy Steps
The holiday season can be one of the most exciting times of the year, filled…
December 9, 2021 Call Us